You must be logged in to post messages.
Please login or register

Modding and Scripting
Moderated by Yeebaagooon, nottud

Hop to:    
loginhomeregisterhelprules
Bottom
Topic Subject: A Beginner’s Guide to Modeling With 3ds Max and ABE
posted 11 February 2014 11:26 AM EDT (US)   
Welcome!

In this tutorial, we will be putting a teapot into AoM. That’s right; a massive checkered teapot, complete with player color, animation and attachpoints. The tutorial has plenty of pretty pictures (click to expand) and is aimed at absolute beginners – with AMP anyone can make model mods for AoM. I have updated this guide to cover both the Steam version and the old-school version of the game.


Required software (follow installation instructions)

  • 3ds Max: This is the actual modeling program. It’s almost the same as Gmax, which some of you may be familiar with. You can get 3ds Max for free if you are a secondary school or college/university student. 3ds Max 2016 is recommended and used for this tutorial, but older versions should work, too (at least to 3ds Max 2013).
  • AMP by Tasev (previously called ABE): This little gem converts your models into AoM’s file format. Download here. Make sure you always have the latest version (I’m using 7.0 for this tutorial).
  • The supplemental files for this guide that I posted here.

    Let’s go. During the process, save your .MAX files often.


    Creating the teapot

    Let’s start by creating the actual model. Open 3ds Max (hereafter referred to as “Max”). Close the welcome screen (although it won’t hurt to do some of the tutorials to familiarize yourself with the program). On the right-hand side of the screen, click “Teapot”. Expand “Keyboard Entry” and enter 2 as the radius. Click “Create”. (In case you were wondering, Max’s developer has a teapot in their logo, hence it is included in this menu). (Picture)

    Tap CTRL+SHIFT+Z to center all viewports (optional). Right-click the teapot, click “Convert”, then “Convert to Editable Mesh”. You could go on editing the model but we’ll leave it at that for the moment. (Picture)


    Materials and textures

    Having created the model, it is now time to paint it. This process is called “texturing”. For this step, you will need the supplemental files I posted above.

    Open the supplemental files. Put “teapot.jpg” somewhere handy. You will need this file for Max. AoM itself will need the texture in the .DDT format, however. Depending on whether you have the Steam version or the old-school version of the game, proceed as follows:
  • Steam version: Open my supplemental files and copy the .DDT in the “Textures_Steam Version” folder. Paste it to “C:\Program Files (x86)\Steam\SteamApps\common\Age of Mythology\mods\Teapot\textures”.
  • Old-school version: Open my supplemental files and copy the .DDT in the “Textures_Old-School Version” folder. Paste it to “C:\Program Files (x86)\Microsoft Games\Age of Mythology\textures”.

    Now go back into Max. Tap “M” to open the material editor. In the menu to the left, double-click “Multi/Sub-Object” to create a new multi/sub-object material. Double-click on the new material. “Set Number” to 1. You can use multiple sub-materials, but we will start with one here. (Picture)

    Click on the first sub-material (“None”). Select “Standard” in the window that pops up. Open the new standard sub-material that you just created. (Picture)

    Change “Ambient” and “Diffuse” to plain white (otherwise the texture will be slightly greyed out in AoM). Both of these fields will change simultaneously if the lock is on. Change “Specular” to black. Tick the box that is labeled “Color”. (You can play around with these settings once you're feeling more experienced; for now, leave them as described.) Expand “Maps”. Click on the “Diffuse Color” map (“None”). (Picture)

    Select “Bitmap” in the window that pops up. Select the “teapot.jpg” from the supplemental files. AoM will take the texture filename from this file (“teapot”). Also, if you zoom out of the Material Editor’s viewport, you should now see something like this: (Picture)

    Make sure that the teapot is still selected in the main viewport. Right-click the far-right piece of the material, then click “Assign Material to Selection”. Right-click the middle piece of the material, then click “Show Shaded Material in Viewport”. The teapot should now look like this: (Picture)

    The texture is looking fine and we can close the material editor. (If you want to learn more about materials and textures, see endnotes 2, 3 & 4.)


    (Vertex) animation

    With our teapot being complete with model and texture, we could now use AMP to convert it into AoM’s file format. However, I would also like to show you the basics of animation and attachpoint editing, beginning with the former.

    At the bottom of the screen, click “AutoKey”. The active viewport will be framed in red. Now, any changes you make to the scene will only affect one particular moment in time. (Picture)

    This is where the slider from 0 to 100 comes in. Move the slider to, say, 20. The changes you make will now only affect the 20th slide (“frame”) of the slideshow that we call “animation”. Disable “AutoKey” and you will make changes to all frames, as before. For now, leave “AutoKey” on. (Picture)

    Click on the teapot. In the top right corner of the screen, make sure you’re in the “Modify” tab, and go to “Editable Mesh”. Click on the little red dots under “Selection”. These are called “vertices”. (Picture)

    You can now move vertices around. Remember, you’re still doing this for frame 20 only (“AutoKey” is still on). Click “Select and Move”. (Picture) Go to the top right viewport and drag-select the handle of the teapot’s lid, then drag the selected vertices a little upwards. Zoom out (mouse wheel) if you need more space. (Picture)

    Disable “AutoKey” as well as the little red dots icon in “Editable Mesh”. Click “Play Animation”. You should now have a little animation playing between frames 0 and 20 (by default, Max will play until 100, though). The animation will only be displayed in the active viewport. Click “Play Animation” (“Stop Animation”) again to stop the animation. (Picture) See also endnote 5.


    Attachpoints and conversion to AoM format

    We’re almost done. The last thing I want to show you is attachpoints. You will find them very useful in AoM (see endnote 6). In Max’s menu, click “MaxScript”, then “Run Script...”. Go to the “\scripts” folder where you put RunAMP.ms. (Max should take you there by default.) Run that file. AMP will start up. In AMP, navigate to the “Utilities” tab and you will find the attachpoint menu on the left. Look for HITPOINTBAR and double-click on it. (Picture) You will see a tiny cube appearing at the bottom of the teapot in the top viewport. “Select and Move” it to the teapot’s spout (make sure that “AutoKey” is off!). (Picture)

    We’re now ready to take our teapot to AoM! In AMP, go back to the “Brg Data” tab. Leave the default BRG settings on. You can play around with these settings once you’re feeling more experienced. (AMP’s “Help” menu has a list of all settings and their effects under “Brg Settings Info”.) Now click “Max”, then “Export”. You can see AMP filling up with data. (Picture)

    When the exporting is done, go to the “Material” tab that has just been loaded into AMP. Apply the flag “PixelXForm1” to the material. We’re doing this because we want our teapot to be checkered with player color in-game (blue for player 1, red for player 2, etc.) instead of just black and white. The textures I gave you will allow you to do this (see endnote 4). (Picture)

    Let’s save our teapot in AoM format. For our purposes, we will be overriding Agamemnon’s idle animation, but you can also create new units instead of overriding existing ones (see endnote 7 once you’re done with this tutorial). Depending on whether you have the Steam version or the old-school version of the game, proceed as follows:
  • Steam version: Click “File”, “Save”, and save as “scenario g agamemnon_idlea.brg” under “C:\Program Files (x86)\Steam\SteamApps\common\Age of Mythology\mods\Teapot\models”. You will also need an .MTRL file for the Steam version. (Basically, the .MTRL file is nothing more than an extract from your model that contains information about the materials used, but it is required by the Steam version of the game.) In the “Material” menu that we just used, click “Extract All Materials for EE”, then save under “C:\Program Files (x86)\Steam\SteamApps\common\Age of Mythology\mods\Teapot\materials”. All materials now go into that folder under a filename that specifically refers to our chosen .BRG name. (In this case, we only have “scenario g agamemnon_idlea_0.mtrl”.)
  • Old-school version: Click “File”, “Save”, and save as “scenario g agamemnon_idlea.brg” under “C:\Program Files (x86)\Microsoft Games\Age of Mythology\models”. No .MTRL file is required for the old-school version of the game.

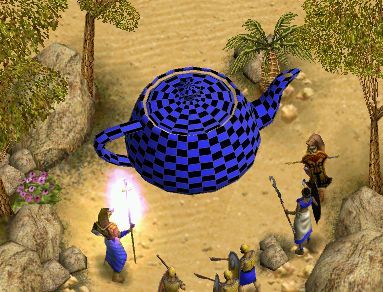
    Finally, open AoM and place Agamemnon in the scenario editor. You should get the massive teapot that I promised you, complete with player color, animation, and an attachpoint that places the hitpoint bar right over the teapot’s spout. (Picture). Congratulations on your first AoM model!

    If your game crashes to the desktop when using your new model, it’s usually because one of the following two problems. 1) Missing .MTRL files, if you’re on the Steam version of the game. Check if you have placed the .MTRL files in the right folder and under the right name. This can happen often. 2) If that is not the case, your model file might be corrupted. Check by opening the .BRG in AMP/Max.


    Notes and further readings
    1. Max offers excellent online help resources and tutorials which will help you develop your modeling skills.
    2. In our case, we only have one sub-material, and it is correctly assigned to all of the teapot’s polygons. Generally speaking, you want to make sure that the material is indeed assigned to all polygons, or assign it only to certain polygons if you are using more than one sub-material. To this end, leave the material editor open, navigate to the “Editable Mesh” modifier of the teapot and select all (or some) of its polygons. Right-click the desired middle piece of the material, then click “Assign Material to Selection”.
    3. Doing the above will tell Max where to put the desired textures but not how. In particular, it doesn’t know how to map the texture on the object. You will need a UV map. This is where the “Unwrap UVW” modifier comes in. Read this tutorial. Note that for our purposes, “Quick Planar Map” will suffice. (Picture)
    4. If you want to learn more about how to create your own textures, read these two guides. With regards to the tools you are going to need, download this for the Steam version of the game and AoMED for the old-school version. (You might also need this file in the same folder for AoMED to run.) The two versions of the game use different .DDT file formats. Other than that and the aforementioned .MTRL files, both the Steam version and the old-school version of the game use exactly the same file types.
    5. For advanced character animation, learn how to use bones and skins. AMP can handle skinned animation. To that end, move the Skin modifier to the top of the modifier list.
    6. Attachpoints are a very powerful tool for anim editing. Browse some anims and you will understand. If you are an absolute beginner you can also try this guide or section 5 of this guide. Know that you can link attachpoints to bones, if you have any.
    7. Finally, you may want to create a new unit altogether without overriding Agamemnon. Read this guide to learn how. For most other AoM-related purposes, this guide will have you covered.

    [This message has been edited by Android 000 (edited 09-24-2021 @ 03:59 AM).]

  • Replies:
    posted 11 February 2014 11:53 AM EDT (US)     1 / 28  
    Nice guide!
    I'll try to get some new people to start modding AoM.

    We cannot rely on luck to be successful.
    posted 11 February 2014 01:21 PM EDT (US)     2 / 28  
    Nicely done!

    It seems to work anyway, but usually animated models also have mesh format ANIMATED selected. I also suggest you reference Stephen Caine's guide to modding too.
    posted 11 February 2014 03:18 PM EDT (US)     3 / 28  
    Done. Cheers guys. I also contacted the admins to feature ABE on the front page .
    posted 12 February 2014 11:12 AM EDT (US)     4 / 28  
    I'll have to take a look through this over the weekend, oh by the way I wouldn't count on staff here being very helpful.

    If you want something done you have to do it yourself lol.
    posted 12 February 2014 04:17 PM EDT (US)     5 / 28  
    Yes, do try it out.

    Tasev, maybe you can post a link to this guide on your download page? Also, the preview pic on that page is obnoxiously big, it covers my entire screen. Can you not scale it down and use the screenshot gadget offered by AoMH? Like I did here.
    posted 12 February 2014 08:00 PM EDT (US)     6 / 28  
    I've added a link to your guide. The utility section doesn't have a screenshot box, and I'm too lazy to scale it down.

    I tried your Phalangite. Very nice, he's got good animations! The flail was hilarious, as in any unit
    posted 13 February 2014 04:04 PM EDT (US)     7 / 28  
    You can use this link. I mean, the current one is so big I can't even see the download stats!

    Talking about the flail animation, I noticed how AoM treats the ground plane and (0,0,0) differently. The ground plane will always work to put your unit's feet to the ground, if you so wish. (0,0,0) is where ABE places the ground plane if you don't have one. However, (0,0,0) also serves the unique purpose of showing the Cyclops where to grab and throw your unit!

    By the way, FOLLOWTERRAIN is a great flag for death animations. Instead of falling right through uneven terrain, or hovering above it, your unit will fall flat on its face.

    [This message has been edited by Android GRRR (edited 02-13-2014 @ 04:06 PM).]

    posted 14 February 2014 04:11 AM EDT (US)     8 / 28  
    Thanks for that, updated the image. I guess the base attachpoint location is at 0,0,0, which can probably be overwritten with adding that as a separate attachpoint. The hitpointbar position can also be automatically set by the game. That's an interesting use for the followterrain property.

    [This message has been edited by Tasev (edited 02-14-2014 @ 04:13 AM).]

    posted 15 February 2014 10:20 AM EDT (US)     9 / 28  
    Finally managed to give this a try but I've been having trouble with textures showing up, I also only have GMAX scripts which seem to work so I run the import script to give models like heracles' attack their animation but the textures aren't being applied automatically like they do in GMAX, ignoring this though I run the ABE script but I can't see any green boxes like in the screenshot lol..

    Any ideas what I can do to fix this?
    posted 15 February 2014 10:38 AM EDT (US)     10 / 28  
    I'm pretty sure this is not going to work in Gmax. Can you not get the free student version of Max (see guide)? You'll get used to Max very quickly - the basics are essentially just the same as in Gmax.
    posted 15 February 2014 10:54 AM EDT (US)     11 / 28  
    Yeah this problem is with 3ds I've used GMAX for a while so I'm quite used to how it works, one of the main tutorials I used to learn how to originally use it was actually a 3ds tutorial for Warcraft 3 so it shouldn't take me too long to get used to it again.

    edit - Just to elaborate a little more when I open the 3ds file in 3ds max and run the GMAX import script the model stays black, I wanted to try and play around with the attachpoints for heracles as I based a dwarf king unit (http://aom.heavengames.com/cgi-bin/forums/display.cgi?action=ct&f=19,29283,,all) on him but when I ran the ABE script the menu came up for me but I couldnt see any kind of visual display of the attachpoints like you see on the nidhogg in the screenshot for the ABE download

    [This message has been edited by Modman88 (edited 02-15-2014 @ 11:15 AM).]

    posted 15 February 2014 11:25 AM EDT (US)     12 / 28  
    You don't open the 3ds file and you don't run the GMAX import script - get rid of all that old mess! In order to import an AoM model just open Max, run the ABE script and go File - Open - select a BRG.

    For making a new model from scratch follow the instructions above.

    EDIT: I recommend that you go through the above tutorial at least once so that you get a feel for ABE. I believe that most of your questions will be answered after that

    [This message has been edited by Android GRRR (edited 02-15-2014 @ 04:19 PM).]

    posted 15 February 2014 03:10 PM EDT (US)     13 / 28  
    Just got it working lol probably should have read the guide before I started but I can't wait to have a proper mess around with this though, thanks for the help

    By the way is there a way to delete the original attachpoint and add it back in so you can reanimate it?

    [This message has been edited by Modman88 (edited 02-15-2014 @ 04:26 PM).]

    posted 15 February 2014 06:52 PM EDT (US)     14 / 28  
    Sure. Open Max - open ABE - open BRG - select attachpoint - delete it - add it back in using ABE's list of attachpoints (see guide).

    EDIT: Or just select the attachpoint and delete all its anim keys.

    [This message has been edited by Android GRRR (edited 02-15-2014 @ 07:24 PM).]

    posted 17 February 2014 04:39 PM EDT (US)     15 / 28  
    I'm still having trouble saving the animations for the attachpoints it would really help if you had a short guide similar to this on how to you got your Phalangite unit working though, I really wasn't expecting to run into so many problems early on lol
    posted 17 February 2014 05:18 PM EDT (US)     16 / 28  
    Can you describe exactly what you were doing please?

    Also, I still think it would help if you went through the guide at least once.
    posted 17 February 2014 05:26 PM EDT (US)     17 / 28  
    The guide doesnt really apply to what I'm doing at the moment, I'm trying to edit the attachpoints for older mods I have which are based on existing AOM units (just as your Phalangite is based on the Throwing Axeman).

    Now when I edit say the topofhead, frontchest, lefthand and righthand attachpoints for the hoplite attacka animation I place them around my unit then animate them to move around the same time as my modded units' special attack which is all fine in max but when I save the brg file with the edited attachpoints they seem to just remain unchanged (at first I wasn't importing the settings back into ABE from max but I have since tried this and it still didn't work).

    I notice in part of your guide though you say not to have 'autokey' turned on when moving the attachpoints, i've tried not doing this and simply pressing the 'set key' button instead but still it didn't work.

    I'm basically trying to get a grasp on how to do this so I can start giving units more visual special attacks like in this instance I'm trying to have some glowing axes or hammers dancing around my dwarf king unit as he is doing his gore attack but when I check the animation in the editor it looks as though none of the frames have been saved.

    edit - just a guide showing how you made the phalangite would probably work

    [This message has been edited by Modman88 (edited 02-17-2014 @ 05:46 PM).]

    posted 17 February 2014 07:02 PM EDT (US)     18 / 28  

    your Phalangite is based on the Throwing Axeman

    just a guide showing how you made the phalangite would probably work
    It's not; I made it from scratch, essentially following the procedures described in the guide. I'm not writing another one.

  • Don't worry about Autokey - this was just to explain animation in Max to absolute beginners. In fact, you should be able to get the stuff you're seeing in Max into AoM. If it's looking fine in Max and you don't get the same thing in AoM you're probably doing something wrong.
  • You mentioned that "none of the frames have been saved". Does that involve the mesh as such as well or just the attachpoints?
  • If it's just the attachpoints, did you select the Mesh Flag "ATTACHPOINTS" in ABE before importing?
  • What versions of Max and ABE are you using?

    EDIT: I would really appreciate you going through the guide. Of course it's not directly related to what you're doing now but it teaches you all you need to know about ABE in 15 minutes. This would potentially save us a lot of time and guesswork.


    Modman88 told me he got it working so I'm happy to take more questions.

    [This message has been edited by Android GRRR (edited 03-09-2014 @ 06:11 PM).]

  • posted 07 April 2014 12:48 PM EDT (US)     19 / 28  
    Hey, I get an error when I import it to max. I also made a video guide for you.

    Video: http://youtu.be/b9yEKODWnfI

    The error I get is at the end of the video. Enjoy!
    posted 07 April 2014 12:56 PM EDT (US)     20 / 28  
    Ok the problem is that you selected the green box instead of the teapot. Select the teapot instead and try again.

    We cannot rely on luck to be successful.
    posted 07 April 2014 01:31 PM EDT (US)     21 / 28  
    It still didn't change the error. I still get the same thing.
    posted 07 April 2014 01:46 PM EDT (US)     22 / 28  
    Oh, I skipped that part lol... It looks like you have made a mistake while installing the files (or Tasev did not change the instructions yet ^^) make sure to put the two dlls in the main 3ds max folder, and the ms file in the scripts folder.

    We cannot rely on luck to be successful.
    posted 07 April 2014 01:50 PM EDT (US)     23 / 28  
    I've found its a whole lot of trial and error with ABE, or simply restarting 3ds max sometimes works.

    Try saving the teapot then restart max and import it, also i'm not too sure but I at around the 5 minute mark when your playing with the textures I usually right click the box on the left aswell and select the show in standard viewport or whatever

    + what warriormario is saying lol, I'm sure android will try and help when he sees this aswell though

    [This message has been edited by Dean88 (edited 04-07-2014 @ 01:51 PM).]

    posted 07 April 2014 07:54 PM EDT (US)     24 / 28  
    As the guys have pointed out, you didn't install the script properly. I was having the exact same problem when I first started, see here. Make sure you have the latest version.

    Other than that, your video tutorial is awesome! If you made one that shows the entire process without the error I'd love to link to it in this guide. Three corrections, though:

  • I didn't actually create ABE; Tasev did.
  • Select the smaller one of the checkered textures in Max; the larger one is for the .DDT.
  • In ABE, under the “Materials” tab, apply the flag “PLAYERCOLOR” (see guide).

    Welcome to AoM modding, Dethklok!

    [This message has been edited by Android GRRR (edited 04-08-2014 @ 07:32 AM).]

  • posted 07 April 2014 08:18 PM EDT (US)     25 / 28  
    Great, thanks! It works!

    I will make another video once I get back to my dorm room. One for people who just want to quick learn and another longer video that is in depth and explains what is going on to the best of my ability.

    Excellent guide. I noticed that there were some rough spots and that is why I made a video.
    I just suck at tutorials though haha.
    posted 08 April 2014 07:22 AM EDT (US)     26 / 28  
    Sure, that'd be great. In my opinion, one video should be enough but that's up to you of course. Just make sure to include the points I mentioned to you above. Looking forward to your video!
    posted 08 April 2014 09:35 AM EDT (US)     27 / 28  
    Thanks!, I'm in classes for about 5-6 more hours depending on how long the bio lecture is. Then I'll be heading back to MY room finally haha. Had a great night last night.

    EDIT: Sorry it's taking so long. I was uploading the video and my internet shut off. I'll start the upload after classes today again. -_-

    EDIT AGAIN: So the problem isn't my connect apparently. Youtube just doesn't want me to upload the damned video!

    [This message has been edited by Dethklok (edited 04-10-2014 @ 08:39 AM).]

    posted 10 April 2014 09:45 AM EDT (US)     28 / 28  
    That's weird. Let us know as soon as you've managed to upload it
    Age of Mythology Heaven » Forums » Modding and Scripting » A Beginner’s Guide to Modeling With 3ds Max and ABE
    Top
    You must be logged in to post messages.
    Please login or register
    Hop to:    
    Age of Mythology Heaven | HeavenGames