 posted 15 September 2007 10:26 EDT (US)
This tutorial will teach you how to make units cards for M2TW using Milkshape and Photoshop. Unit cards are the icons you see when you have units on the battlefield, the cards you click on to select your unit. They also appear when you�re reading a unit info screen.
Note: this requires you to have used the unpacker to access the files.
I�m assuming you are equipped with Milkshape 3D 1.8.1b and Adobe Photoshop CS2, as that�s what I�m equipped with. You�ll also need grumpyoldman�s mesh 2 ms3d converter and alpaca�s texture 2 dds converter. You�ll also need the NVIDIA DSS plugin, so Photoshop can read the dds files. Oh, and as the texture 2 dds converter uses a python script, you�ll need Python 2.5.
Photoshop CS2
NVIDIA DDS Plugin - download
Milkshape 3D 1.8.1b - Download trial version
Grumpyoldman�s Mesh 2 MS3D converter - download
Alpaca�s Texture 2 DDS converter - download
Python 2.5 - download
Ok, so after downloading and installing that huge amount of gear, you�re now ready to start making unit cards.
We�re going to be making a new unit card for Armoured Swordsmen. Go to data/unit_models/_units/en_pplate_plate/ and find the model named armoured_swordsmen_lod0.mesh. This is the highest quality model and the best for unit cards. Then go to the textures folder and find m2tw_en_pplate_england.texture. Finally, go to unit_models/attachment sets and find Final Heater_england_diff.texture. Copy all three files to your working folder, i.e. my_ui.
Now, extract texture_converter.py and convert_all_textures.bat from your RAR archive. Extract them to the same folder your texture is in. Now, run convert_all_textures.bat and you should see a DOS window pop up. When it says done, close it and there will be a dds copy of the textures in your folder. Open them in Photoshop and then save them as png�s, otherwise when you try to import the textures into Milkshape later, it has some annoying effects that are detrimental to the look of your unit card.
Start up the mesh 2 ms3d converter and select file/convert/.mesh to .ms3d.
Navigate to my_ui which should be in your m2tw main folder, and select the .mesh file.
Here you get a view of the model before you convert it, and you can use the arrow keys to zoom in and out and to get a full 360 degree view of the model. Then press Proceed, and save into my_ui.
Now both elements are converted and ready to work with. Onto step 4.
Open Milkshape, then select file/open and open your ms3d file. You should have something that looks like this:
A few things, all the lines all over the place are the joints of the unit. To make them manageable later when you have to move them, go to file/preferences and select the misc tab. Change the joint size from 1.000000 to 0.025000. The changes should be obvious. You�ll notice the unit is very dark, to change this, go to edit, then select Refresh Texture. The whole model will look pretty much like it did in the mesh to ms3d converter. Now, to import the textures, click on the materials tab and select figure from the list and select the first button that says <
Now, the shield looks a bit weird, this is because the shields are different sizes. Go to the groups tab, and from the list, delete the first three �heater� entries by selecting them and clicking the delete button below the list. You should now have a white shield with a red cross on it. If you don�t, Ctrl+Z and try again.
So now we�re ready to make the pose, and screenshot the unit to make the unit card. Onto Step 5.
This part is more of a trial and error than monkey-say-monkey-do bit of the tutorial, so I can�t really tell you a lot. I�ll get you started on the essentials though.
In the bottom right hand corner of Milkshape, click the Anim button. Now the model will move with the skeleton.
To select a joint, go to the model tab and select �Select�. You can now select any of the joints. To move them, select �Rotate�. Clicking down and dragging will move it. You cannot move any of the joints in the 3d window, so you have to do it with the other three. The first window does up and down, the second window does in and out and the third window does side to side.
Top tip: If you have an idea for the pose you want your soldier to take, it�s a good idea to get up and mime the pose yourself, then look down at your body and make note of where your legs, arms etc. are. This makes it a lot easier and more realistic when it comes to the pose your soldier will take.
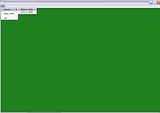
Ok, you�ve now made your pose, go to the joints tab, and uncheck �show skeleton�. Click on the 3d window and press spacebar, this put it into full view. Right click on the window and uncheck �show axis� and �show grid�, you should now have you soldier in his pose and a plain blue background. Drag the mouse cursor around until you have an angle that you�re happy with and press alt+print screen. Then close Milkshape and open Photoshop.
Make a new image, the dimensions should already be set up for you, and press Ctrl+V. Your screenshot should appear there. Select the cropping tool and crop the image down to just the unit with some space around it.
Top tip: At the top of your screen in Photoshop, there should be two boxes labelled width and height. Fill these with 191 px and 280 px respectively, and Photoshop will resize the image to those dimensions automatically when you crop. You�ll also notice your crop box has been locked to those proportions.
Once you�ve done that, you should have something like this:
Next, if you want to add a border onto your unit card like in the vanilla m2tw ones, download the border from
Before we do anything else, select the blue bits with the magic want tool and delete them. Makes it neater to work with. Now, open the border image.
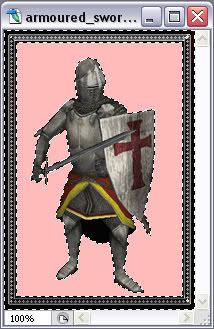
With the marquee tool, select the whole image, and then using the move tool, move the whole border over on top of your unit. Using the marquee tool again, select the white space and delete it. Close the border image and you should have something like this:
Now go to Windows/channels. In that list make a new channel and you should see a new channel and your image should go black.
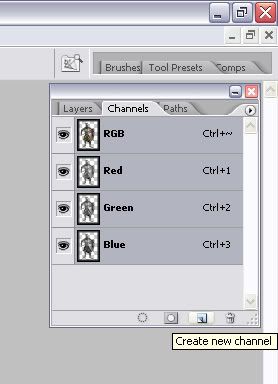
Click the RGB channel and it should look like this:
At this point, if you save the file as a tga, 32 bit, then re open it, it seems to sort out a lot of possible problems.
Top tip: When selecting with the magic wand, turn anti aliasing off at the top, this stops it over selecting and producing a white �glow� when you see the card in game.
Back on the channels, unselect the alpha channel, and with a tolerance of 190, select your unit, with any luck the unit and the border will be selected at the same time. You may have to click around to eliminate gaps. Then select your alpha channel again and using the paint brush tool on white, paint in the selected area. You�ll notice the red tinge disappears, and the unit you paint becomes normal colour. Save your tga as armoured_swordsmen_info.tga.
Now, while it�s still open, select the crop tool again and set the dimensions to 48 px by 64 px. That�s the size of the small unit cards in M2TW. You don�t want to select the whole unit, so only select the torso or something like that. Make sure the border isn�t included.
So there you go, save the small unit card as #armoured_swordsmen.tga and save it as 32-bit/pixel, so the alpha channel is saved. So now we put them in game.
Take armoured_swordmen_info.tga and put it in data/ui/unit_info/England and select yes when it asks you if you want to replace it. Take #armoured_swordsmen.tga and put it in data/ui/units/England.
Enjoy.
Exilian - a website for mods for Mount&Blade, Rome Total War, Empire Total War and news about Shogun 2: Total War
"There is no extreme metal, death metal, progressive metal or vegetarian metal." - Tryhard
"Light infantry, rangers, and riflemen all have the unique ability to pull yard-long poles from their arseholes and plant them in order to stave off cavalry." - BurningSushi460
[This message has been edited by Primo (edited 09-16-2007 @ 10:28 AM).]
