You must be logged in to post messages.
Please login or register

Rome Strategy Discussion
Moderated by Terikel Grayhair, General Sajaru, Awesome Eagle

Hop to:    
loginhomeregisterhelprules
Bottom
Topic Subject: Seige defence tactics 1: By EoJ
posted 26 May 2006 12:39 EDT (US)   
Here we go, my offering to the fore. Remember, this is single player

Faction: Any, but factions with Phalanxes part of their tech tree ware a bonus
Need: at least 3 units of reliable hoplites (Mercs will do fine here), at least 2 units of heavy cavalry (EG, sacred band, cataphracts, etc)
Diagram:
Explination:
This is a stratagy I use to defend (Civilised) Towns, large towns and cities that don't have stone walls yet, although you could pull it off. Basically, the red arrow is the enemy's line of attack. The AI will charge almost certainly down the main street, where you will put your phalanxes (Black bars). Here, they will hold the line until every unit teh enemy has is in that main street, or at least 3/4s of them. This is where your heavy cavalry (Black dimonds) come into play. Run them around the edge of the town (As shown by the black arrows) into the back of the enemy trying to take out your phalanxes. Then, you run them into the back of them. The enemy should rout in about 2-3 seconds. Your cavalry will gain up to 3 chevrons of experience, and an army will be utterly annileated with about 2-10 survivours if the suicide cavalry the AI sends into the phalanxes got away.

Q&A
Will it work? Yes, or I wouldn't be telling you it
What happens if the enemy goes round the side to try and get to your cavalry before you are ready to go round the back? Draw them further into the city, past a turn for the plaza. When they turn off, hit the from the sides. You are free to carry out the rest of the plan.
What about phalaxes? You're screwed. [/jk] Seriusly, a charge from the back in a confined space will rout anything bar Spartens (And we all know how many of them the AI makes)
What about elephants? Keep some archers in the city to make them run amok. If you're caught unawares, your only real hope is to mob them.
Can you do this with stone walls? Yes- set up on the ground, deep in the city, and start the cavalry's run around the back sooner, as it has more distance to cover. The reason why you set up deep in the city is because if the enemy takes a tower it can be a headache when it fires at you.
I have no heavy cavalry! Don't panic! Use massed light cavalry (About 4-6) and it should have about the same (If not a greater) effect. Or you could use a unit of Elephants. Good Toon oppertunities there.

Well, I think that's about it. Sorry for the size of the diagram, Image shack scaled it down and I can't be botherd to make a bigger version.


And I shall go Softly into the Night Taking my Dreams As will You

[This message has been edited by EnemyofJupitor (edited 08-31-2006 @ 05:26 PM).]

Replies:
posted 26 May 2006 14:04 EDT (US)     1 / 5  
This is an awesome tactic. One of my favorite! I do this every time! When you have your Phalanx in the streets lined up, its complete devestation for the enemy! I was also going to do a thread about this, but EOJ beat me to it.

Nice work!

posted 26 May 2006 14:19 EDT (US)     2 / 5  
Question: What if I'm outnumbered?

Answer: Your best bet is to just hold the main center complex with all phalanxes pointed outward with a reserve of cavalry of infantry at the opposite walls of the settlement where the enemy attacked. when the enemy are engaging your phalanxes, give them the backdoor bang!

posted 26 May 2006 14:23 EDT (US)     3 / 5  
^ EOJ's tactic is just fine. No need for anything else, except maybe some more Phalanx's in the centre, to answer your question!

Or check my Siege Defense Tactic #2

[This message has been edited by Undefeatable (edited 05-26-2006 @ 02:23 PM).]

posted 26 May 2006 16:00 EDT (US)     4 / 5  
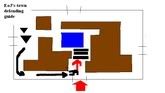
I prefer phalanxes at breach points myself if I have enough of them for non-stone walls (if I only have a few I usually use the same tactic posted). The reason I prefer breach points is you can handle pretty well anything the enemy can throw at you with minimal losses bar the enemy general. I Position my troops in a 'V' shape covering the expected breach (at the start of a siege you can see how many rams the enemy has, and can usually predict fairly accurately where they're going to strike with them), with my general in between the various 'V' phalanxes with the main purpose of stoping them from routing (and towards the end of the game killing any routing enemies).
The reason I prefer this strategy is for a number of reasons; the enemy will never attack one breach point with their full army (a risk if you fortify the centre of the town), meaning your hoplites have less risk of being overwhelmed and therefore suffer fewer losses. You also effectively flank the enemy from two sides as they come through the breach point, and they are forced to turn to one of your phalanxes then (exposing their back to the other phalanx). As a result your phalanxes can usually handle enemy phalanxes with only minimal losses. The enemy will also come through at a small rate, meaning your hoplites suffer an even greater reduced risk of being overwhelmed. Positioning your troops close to the walls also has the added advantage of mostly protecting them from enemy missile units (which could inflict minor casualties if you fortified the middle).
Finally, you are able to predict where the enemy will go, and can stop any risk of the enemy splitting their force to go behind you (e.g. if fortifying near the centre with cavalry force to the side ready to flank, there's a risk the enemy may split their force, sending some troops to your cavalry, and others to the centre).
Once the enemy attacks your phalanxes, they'll eventually suffer so many casualties that they rout. At this point you can send your general to mop up any survivors, although one note of caution is if the enemy has a large force heavy cavalry with 2 hp (e.g. general) yet to engage, as if they charge basic militia hoplites you may suffer some casualties (and the risk of a rout) if your general is away.
With this strategy I've been able to defend settlements vastly outnumbered by the enemy, usually wiping out almost all of the attacking force. The only casualties I usually suffer are a handful of losses to militia hoplites and minor damage to my generals unit depending on how quickly I pursue the first routing units.
Of course I haven't had the chance to extensively test the strategy against high quality troops using just militia hoplites, but presumably if you made sure your hoplites were semi-decent against a powerful force you'd still be fine (e.g. don't try defending a breach with 2 militia hoplites when against a force of elephants!)
posted 26 May 2006 17:17 EDT (US)     5 / 5  

Quote:

I was also going to do a thread about this, but EOJ beat me to it.


It's because I made it, or at least trumpetted it loudly on the forums.

Quote:

Question: What if I'm outnumbered?


It works fine anyway. I've beaten 2 full stack leigons with this.

Quote:

meaning your hoplites have less risk of being overwhelmed and therefore suffer fewer losses.


In my experience my hoplites never took more than 100 casulties, and that was with Nile spearmen.
The defend the-breach thing is fine, and a good tactic, but what happens if you have:
3 sacred band infantry
2 Sacred band cavalry
And the enemy has 4 rams, and lots of men?

Now you see when to use this strat


And I shall go Softly into the Night Taking my Dreams As will You
Total War Heaven » Forums » Rome Strategy Discussion » Seige defence tactics 1: By EoJ
Top
You must be logged in to post messages.
Please login or register
Hop to:    
Total War Heaven | HeavenGames